
At the time of this writing I drive an ’04 Mazda 6 (automatic, with lowest-level stereo and temperature control). I was tired of either lugging around a book of CDs or using hacked up FM transmitters to listen to my music. My Mazda didn’t come with anything in the Mini Disc/Tape Deck port, and I had briefly considered purchasing a tape deck from Mazda in order to use one of those Aux In Tape Adapters to fit my needs. However, at $200 for a piece of antiquated technology, I had my eyes out for a more cost efficient alternative. Enter the Sylfex AuxMod.

The AuxMod Basic is a wonderful piece of hardware that plugs into the existing TapeDeck/MiniDisc port on the Mazda 6. It has a female 3.5mm connector that lets you plug in an auxiliary device and play it through the Mazda Head Unit when “Tape/MD” is selected. It won’t let you interface with the device via the seek buttons (they have, or used to have, an advanced model that could do this), but that didn’t matter to me anyway. Plus, with a $60 price tag, this was something I could get behind.
Now – on to the main purpose of this guide. The Sylfex site has a decent install guide for their hardware [PDF], but it doesn’t give much visual detail on removing all the parts that you have to remove to actually GET to the head unit. There are a few other guides around, but for the most part I just found forum posts saying “It’s easy” or “Just follow these steps” without any pics. So I am going to supplement those with a visual guide from start to finish. If you want additional resources, I found these instructions for a different hardware install [PDF] useful as well. And this site had some pretty good pictures of how to remove the center console.
DISCLAIMER: My car is a disgusting mess, due to two dogs that shed their body weight each week and frequent telecommuting trips. Please forgive the nastiness in some of the pictures, and know that a good time to clean is when everything is taken apart! Also, I make no warranties about this guide, what worked for me may not work for you, so use common sense and be safe. Staying calm and not frustrated will ensure you don’t snap something that will be expensive to repair.
0. Put the car in Neutral and apply the parking brake
At first I tried to take apart everything with the car in Park, but the position of the shift lever made it near impossible to get the trim piece up and over the long shift bolt. So do yourself a favor and put the car in neutral (ON A LEVEL PIECE OF GROUND) with the parking brake engaged. Some of the pics will show the lever in Park, because I took them before I realized my mistake. NOTE: I had to leave my keys in the ignition while the car was in neutral, and I left them there for the remainder of the install process. Make sure your doors are unlocked before you shut them!
1. Disconnect the Negative (-) terminal of the battery
I once busted a friends speakers by messing with wiring while the battery was plugged in. Always a good idea to remove the negative cable and let it sit for ~5min so that any stored up charge can dissipate.
2. Unscrew the shift knob
This part’s easy. Just twist the shift knob counter-clockwise and it should eventually pull up and away from the long shift bolt. Ignore the fact that the shifter is in park in the first image below, it should be in neutral.
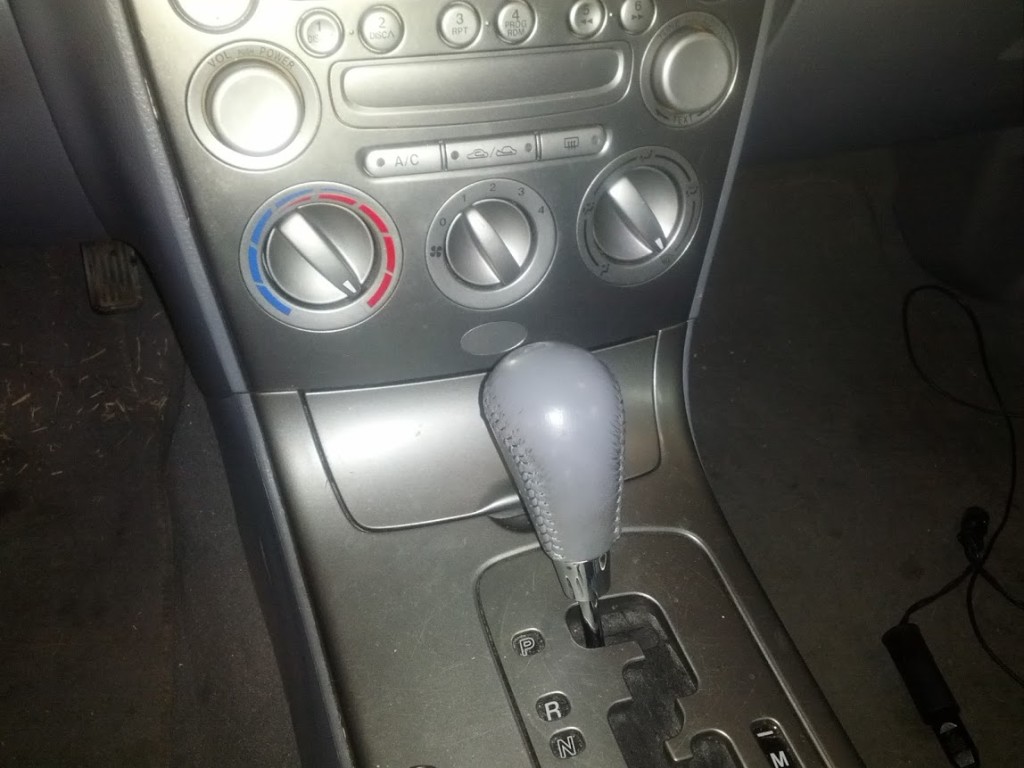

3. Remove the cup holder
This is pretty straightforward as well. I found the easiest way was to partially close the lid to the cup holder and slide a thumb into the gap between the back portion of the lid and the holder and pull up. There are four clasps at each corner, and no wires that attach, so once one side is loose it will be easy to completely remove the cup holder unit. No tools should be necessary.


4. Remove gear selector trim
This is where it’s important to have the selector lever in neutral. By applying a forward and upward force to the trim around the gear selector, you should be able to get it to pop free. Again, there are a few snap connectors on each side that you’ll have to get free before the whole thing will come loose. This part DOES have wires attached. There are two light connectors at the rear of the trim panel (near the parking brake), and a single light and the 12V DC socket connector at the front of the panel. I didn’t bother disconnecting the lights at the rear, and instead unplugged the two up front so that I could pull the trim up and over the gear lever bolt and let it sit back still attached by the rear wires.


5. Remove center console screws (2) and temp control knobs/screws (3 knobs, 2 screws)
Right above the front connectors for the light and the DC socket you just unplugged you will see 4 screws. The two on top attach the plastic front plate of the center console to the dashboard. These two screws must be removed. Additionally, gently remove the manual temperature control knobs by pulling on them. Under the two outer knobs you will find two more screws. Remove these as well. In this step you should have removed a total of 4 screws.


6. Drop the glove box and remove the security bolt
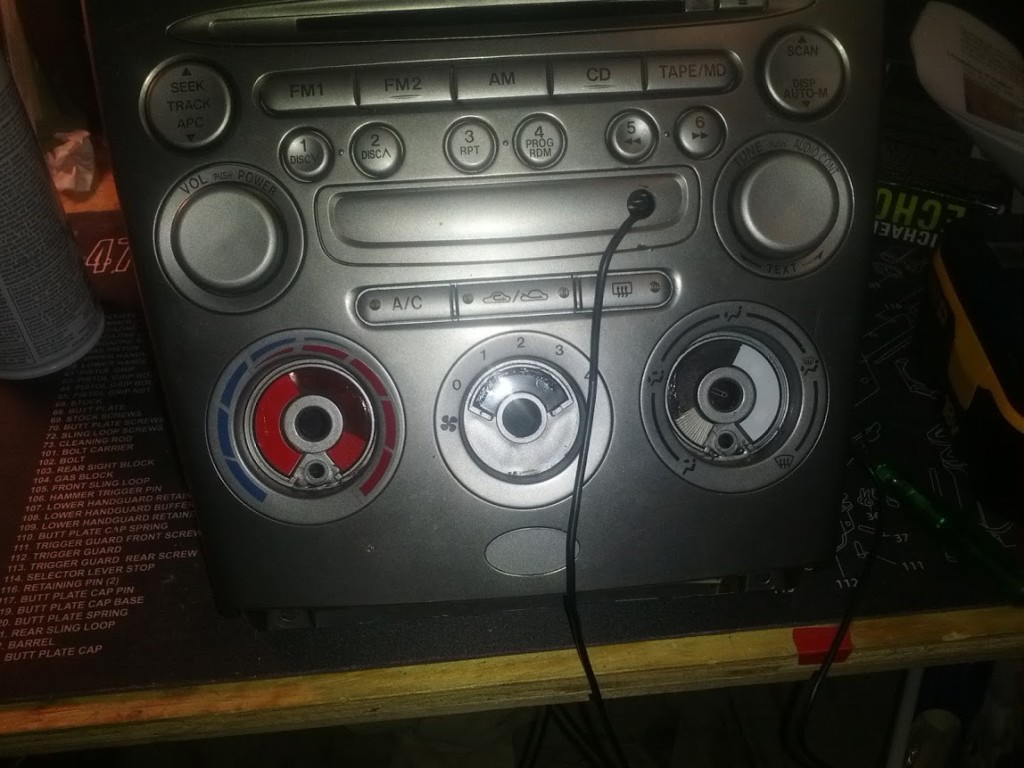
Now we need access to the inside of the dashboard, where the head unit security bolt is located (or should be located). To access this area, we must drop the glovebox out of it’s normal line of travel. This is very easy. First clean out all the crap in your glovebox (old registrations/insurance, extra napkins from Wendy’s, etc), and with the glovebox open, press the sides towards each other and it should fall out of it’s track and pivot to the floor. If you cram your head and a flashlight into the glovebox like you’re trying to look at the backside of the radio, you should see a bolt that is in a hole marked M6x10 MAX. My car was missing this bolt (probably forgotten at a shop at one point in the past). This is the last item holding in the head unit, so remove it and we can get the unit out of the car!


7. Disconnect and remove the Head Unit
This was another difficult task. There are four snap clips that connect the head unit front panel to the rest of the dashboard, as seen in the pictures below. These muse be released before the head unit will pull out. I had some luck gently wiggling the head unit from the bottom until one side popped free. Be careful about how much your torque the front plastic face though, you don’t want to crack anything. Once the head unit can slide forward freely, gently pull it away from the dashboard until you see the 4 connections you will need to unplug. The 3 terminal block connectors have tabs/slots that will need to be released before they pull free. The black cable on the left side of the unit as you’re looking down from above is the antenna connection and it can just be gently pulled out. Once the head unit is completely disconnected, you can gently remove it from the dash completely. Be careful not to scratch it on the bare shift lever bolt. Since it was cold when I performed my install, I moved the whole unit inside to warm the metal up a bit to make the foam tape on the AuxMod adhere better.


8. Install AuxMod and route cable
The AuxMod doesn’t come with a connector cable, so you’ll have to come up with a cable that fits your needs based on where and how you want to interface with the head unit. The AuxMod FAQ provides a few options, such as routing a cable down past the gear selector and out through a hole in the cup holder, or over through the glovebox. It also is your choice as to what kind of end you want on the cable. If you want a male end that you just plug into your device, select a male-to-male cable of sufficient length. I opted for a surface mount cable, male on one end to plug into the AuxMod, and female on the other with a wide flange so I could mount it on the plastic face where the MiniDisc/Tape Deck would normally go.
While your cable routing may be different, installation of the AuxMod will be the same. Gently test the connection of the AuxMod first, making sure you make a solid connection. Don’t rock or slide the AuxMod into the connector. Charge built up in the head unit that hasn’t dissipated could damage the AuxMod if it’s wiggled into place. Once you’ve verified the fit and placement of the AuxMod, clean the area where the foam tape will attach with a small amount of rubbing alcohol (just to remove dirt and grime). Once it’s dry, peel off the foam tape backing, install the AuxMod at a slight angle to keep the tape off the metal housing, and once the connection is solid, gently press the foam tape into place. Done! Your new auxiliary input is ready to go. If you’ve opted for a surface mount female cable and are going to install it in the empty plastic tape deck face plate, CAREFULLY drill the correct size hole you need with the plastic plate in place (I couldn’t get mine out and discovered there was plenty of room to drill the hole with the plate installed). Run your cables and use cable ties to tidy up any excess.


9. Reinstallation
Now that all the modifications have been made, follow the uninstall steps in reverse to put the head unit back in place, along with the security bolt, screws and knobs for the temperature control, shift trim piece and cup holder. Also be sure to plug back in all the cables to the head unit and the 12V socket and light in the ashtray. Once everything’s back in place, reconnect the negative terminal on your battery, shift back into park and test out how awesome your new input sounds!

Reverse the install directions to reinstall the head unit. In the car and working great! You just need a male-to-male 3.5mm cable to go with your device and now you're set!
Romeo Tani
MD Schmidt
Scott
MD Schmidt
Nate
modmad