
In 2017 I was finishing up my 6 and a half year stint at Lexmark International as a band 3 firmware engineer. Due to a series of company-wide cutbacks and as the pioneering remote-work engineer (in other words – easier to let go because I wasn’t in the office all the time), I was looking down the barrel of inevitable unemployment. My long time mentor/boss/friend Bill Gregory had been awarded a Phase 1 SBIR by the Office of Naval Research to create software that would make it easier for Marines with little technical skill to take advantage of synthetic training – that is, training that occurs on a computer in an immersive, digital environment. Bill asked if I wanted to give development for the Navy a try for 8 months to see what we could grow, and I enthusiastically agreed.
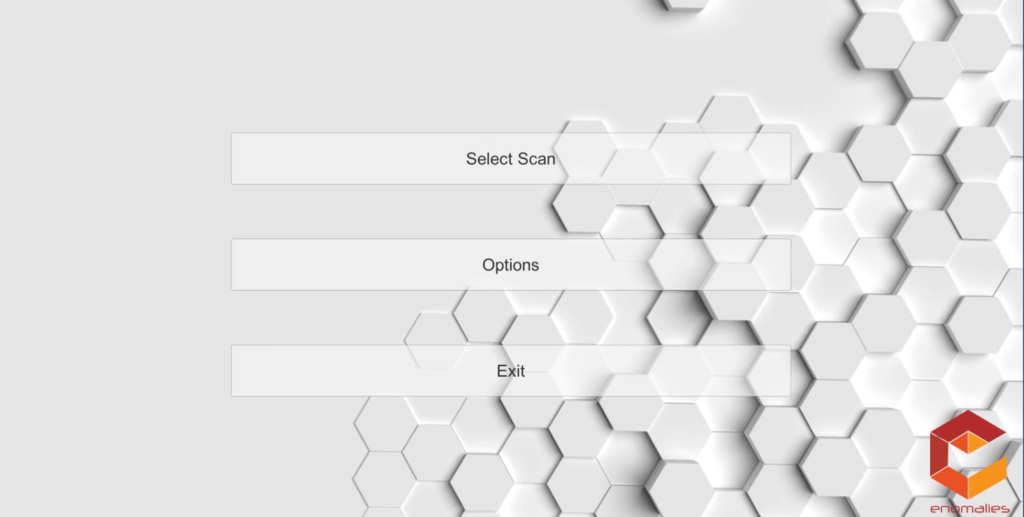
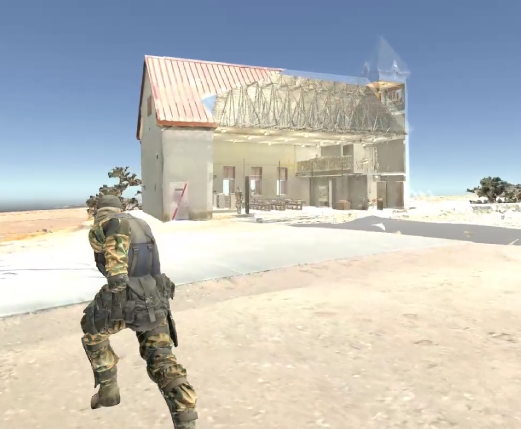
RSET MVP 1
I started the effort with zero background in Unity or C# development. Coming from the land of firmware and bare metal, it took a little acclimation to working in userland, but it was a welcome change of pace. In 3 months I put together the fist MVP of RSET. I hadn’t worked out the ability to dynamically load 3D Scan data, instead relying on the Unity build pipeline and a custom build-helper to create standalone Unity projects and executables for each individual scan.

Despite the clunky first iteration, this was the perfect MVP – from zero Unity experience to something tangible to showcase to ONR at the Spring Review. Our specific program had two annual reviews – the spring session was dedicated to an intense technical overview of the progress made in the past year and open questions from all of the other programs and fund recipients. The fall review was more of a flashy demo with a quick 10 minute update, meant to engage with external groups and showcase what ONR was successfully funding. So for the Spring 2018 review, the “Enomalies 3D Pipeline” was the most software progress shown on the grant so far, so it was well received and gave us a spring pad off of which to discuss future improvements and changes.
RSET MVP 1 – Improved
Although I didn’t get to attend the spring meeting, Bill’s feedback provided a list of action items I knew we’d need to implement to stay ahead of the curve. We had competition (with deep pockets) within the programs capabilities portfolio, so if we weren’t able to simultaneously out-perform and out-network the alternates, our funding would be cut. In fact, mid-summer of 2018 the Option for our Phase I SBIR was cut. Bill took on debt to keep the company afloat, and we both took massive multi-month pay cuts in order to try and make our case for existence at the Fall 2018 Review. In 6 months we were able to deliver:
- Dynamic Scan Loading – gone were the days of creating a Unity Project/exe out of each scan. We could now select scans directly from the “Rapid Synthetic Environment Tool”!!
- Capture Examples from Fort Knox – prior to this point we didn’t have any DoD-related assets to showcase the capabilities of RSET – everything was residential in nature. Bill coordinated a visit to the MOUT (Military Operations in Urban Terrain) site at Ft. Knox to scan Zussman Village, which we captured using a Matterport Camera and using structure from motion to showcase the various capture methodologies usable by RSET.
- Semantic Segmentation – this was a research vector that’s still in our back pocket, but the ability to intelligently remove, label, and replace aspects of a scan were important to alleviate the need for highly technical field personnel.
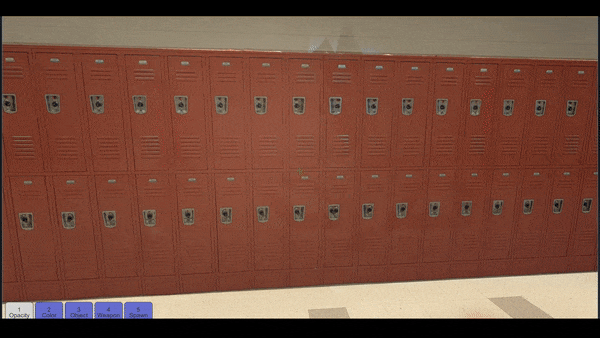
- A full Exploration mode – This is where our program officers jaw hit the floor during our demo. Our avatar now came equipped with a sidearm and a myriad of 3D tools useful to making quick, easy changes to an environment – an opacity tool to see through walls, a quick-spawn tool to drop in 3D objects, a floor plan view to look at an environment from overhead, and VR support.
I still remember the reaction of the program director when we took a scan created from one of the other performers and were exploring it inside RSET in under 2 minutes (most of that time was transferring the scan via thumb drive). The actions and uncertainty over the past 6 months paid off in the end, as we were thanked for our (unfunded) effort and awarded a Phase II SBIR grant to continue our work.
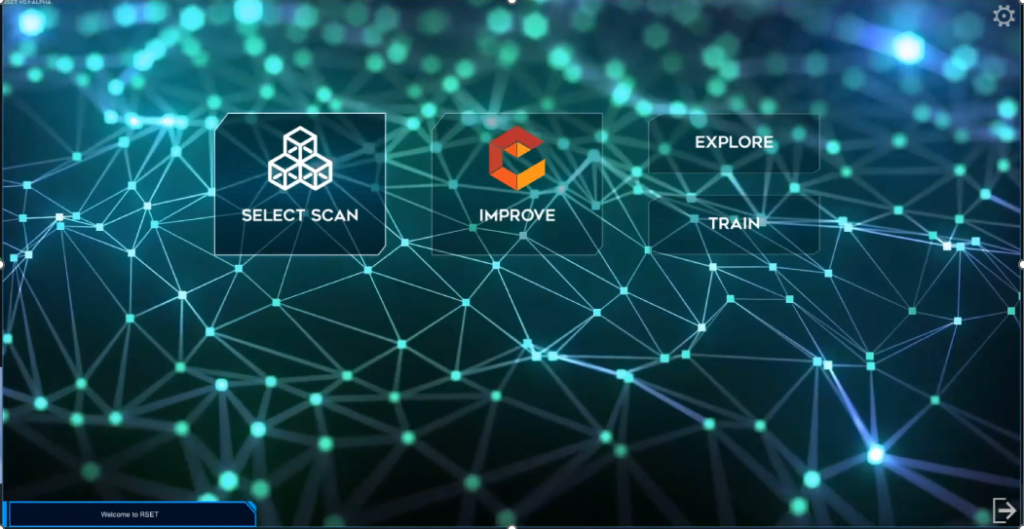
RSET Alpha
The awarding of our Phase II SBIR meant two things – one, a longer runway for technical planning, and two, a necessary focus on commercialization. Although I served as CTO for the effort and was heavily involved in the commercialization efforts, I’ll only focus on the technical side of things for this article.
If we thought the unfunded progress over the summer of 2018 was impressive, what we’d accomplish between September 2018 and February 2019 set the bar even higher.
The UX for RSET was completely overhauled to make room for additional modes of interaction with the scanned environments.
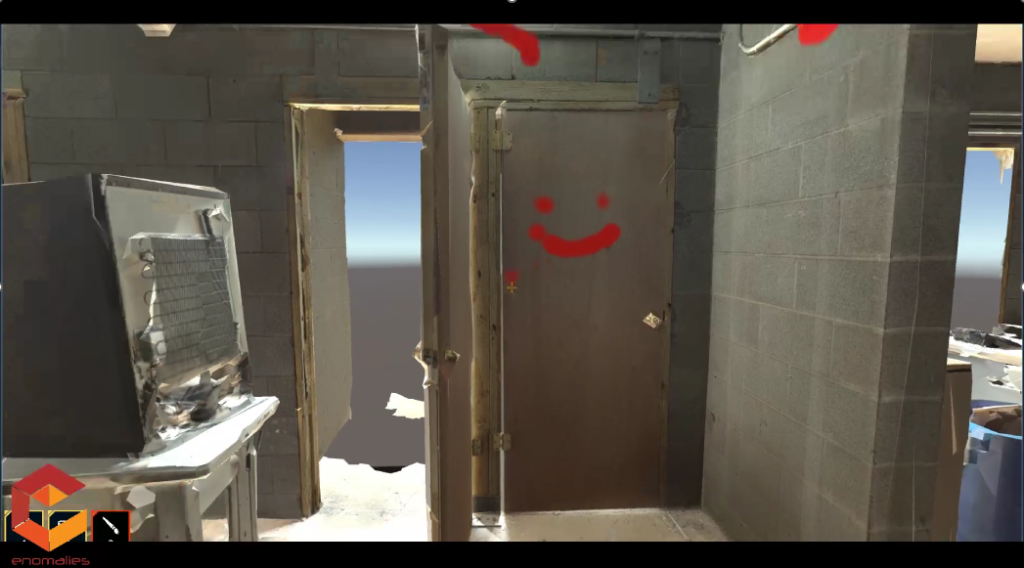
We implemented a paint-tool asset that let our users markup and paint on their meshes.
I implemented terrain loading, which is like an iterative process of the scan loading we were accustomed to. A “scan” was, for us, generally a single building interior. This was pretty new for DoD, as most of the 3D content they used was exterior terrain captures of large swaths of land, generated using photogrammetry and drone footage. By studying the output mesh structure of some of the more popular terrain generation programs, I was able to include an ingestion routine that would analyze a collection of terrain data and let our users select their desired level of detail (not a dynamic LOD, just a pick-once) and handle all of the loading of those meshes automatically instead of forcing our users to hand-load dozens (or hundreds) of mesh and texture files.
The obvious follow-on to this capability was interior/exterior merging. With our expertise (and growing catalog) of interior data, we could integrate interior models with our new terrain loading features. I defined a JSON standard for RSET so that interior scan data could have metadata about global orientation and door locations. Using this data, RSET could now offer to import building interiors when an exterior dataset was loaded, and dynamically generate the correctly sized and positioned colliders on doors that would let our users seamlessly walk from exterior to interior, even if the “doors” on the meshes themselves were closed. It also allowed us to study sight-lines and angles from inside and out with the Opacity Tool.
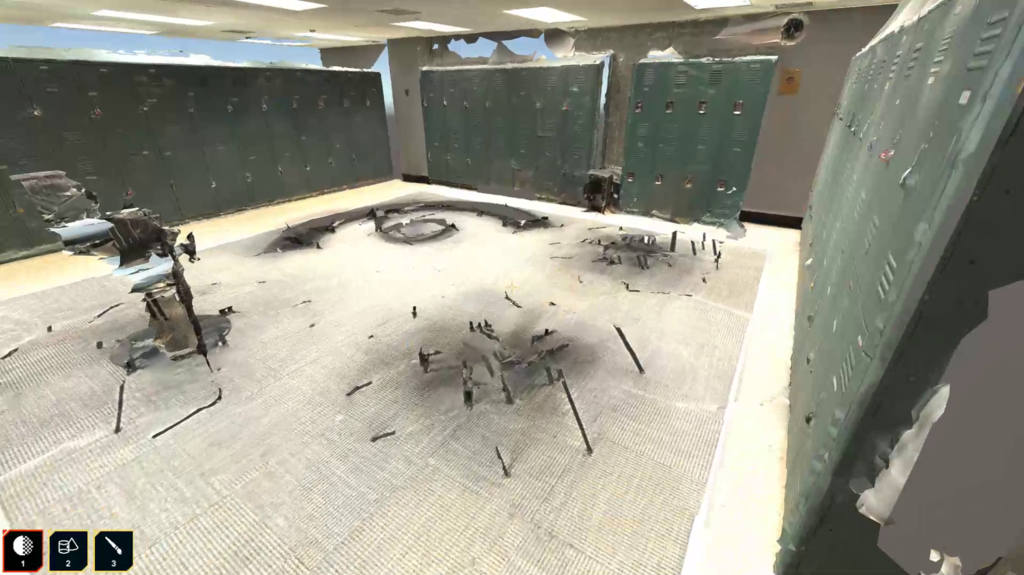
Room Culling was a big priority at the time, although it’s importance in our backlog would slip shortly after the initial effort. The idea behind room culling was to allow a user to “cull a room of objects” at the click of a button. This brought me deep into image processing and let me dust off some Python skills that had been long dormant. Using a combination of a vertex density map to choose a horizontal slice of the room with the least obstructions (most likely to be just the walls), followed by canny edge detection and a Hough Transform, I was able to (slowly and not extremely accurately) back out the mesh faces that most likely belonged to walls, floors, and ceilings, and write only this data to a new mesh. The process was far from optimized, but that’s what MVP’s are for.
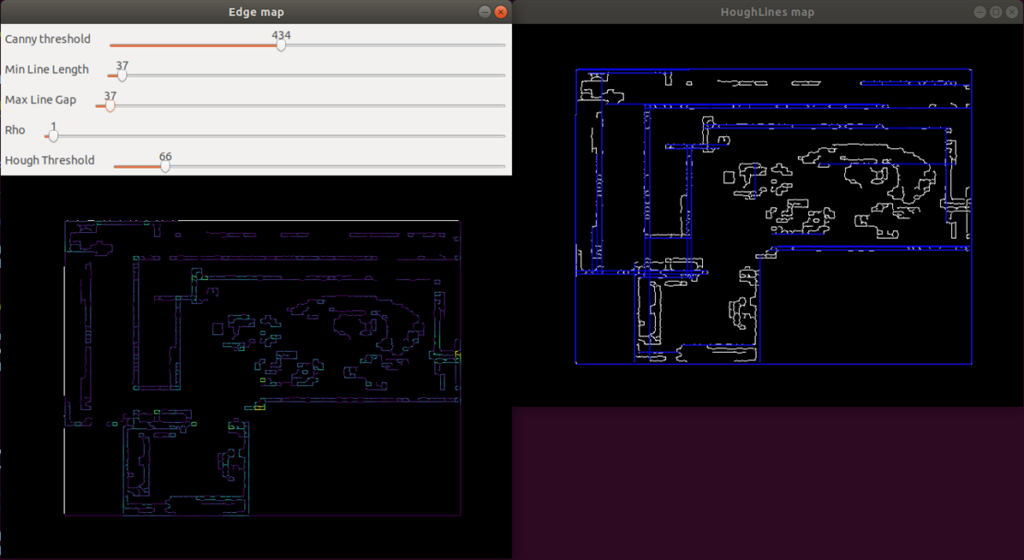
Before:
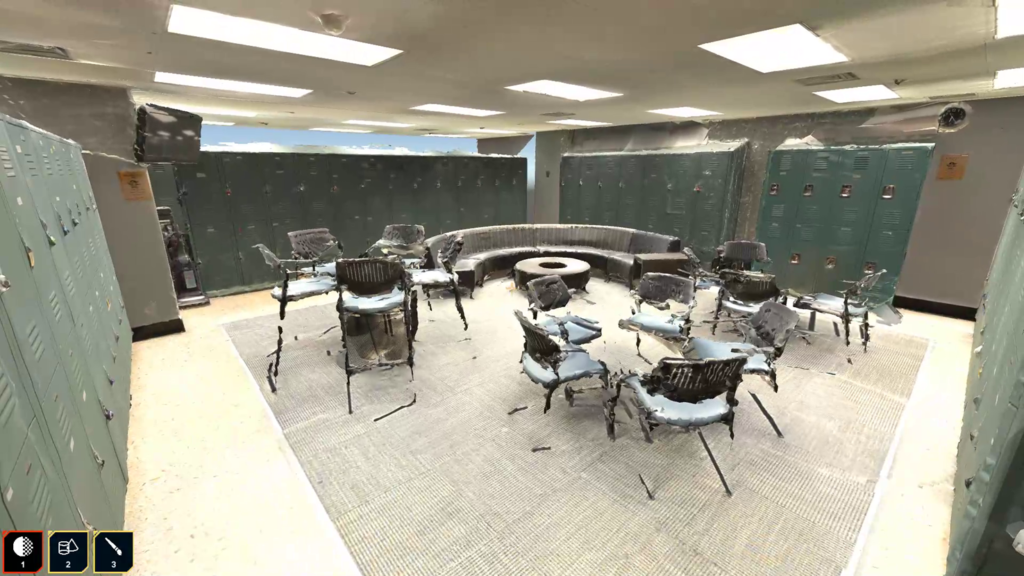
After:
Other features as part of this time-crunch included dynamic lighting (the ability to increase/decrease the intensity of lighting at runtime to simulate environments at night), the introduction of specialized training (we started with firefighting generated at-will inside any scanned environment and this ended up being an important step towards private sector commercialization), and measurements (subject to the accuracy of the incoming scan data). We also hired a networking engineer to produce an MVP for an online photogrammetry pipeline (nicknamed MIST – Media Integration/Simulation Tool) that lets our users upload 2D photos and videos and receive 3D .obj files back.
Scenario Introduction
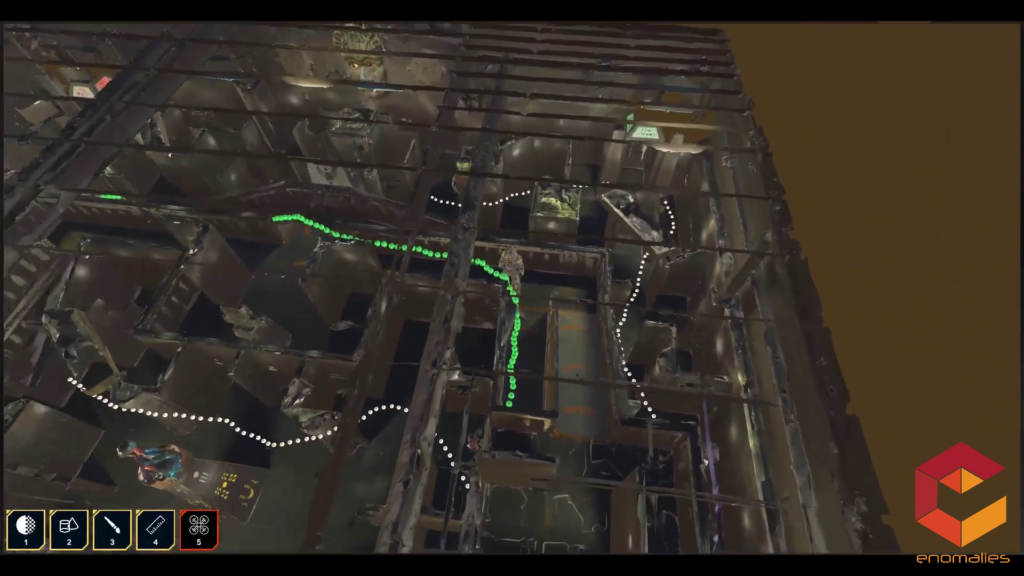
Over the summer of 2019 I dove headfirst into some of the more esoteric imaging techniques used in our photogrammetry / structure-from-motion pipeline to see what extra data we could glean and use. Heading into the fall review, we had demos of environment reconstruction from a camera mounted on a rifle to demonstrate what we would later coin passive capture – environments captured by a person when their focus was on other tasks (e.g., CQB and room/building clearing). Part of the deep dive into our pipeline let me harness the relative camera positions that were generated as part of the 2D-to-3D conversion process, and I used those camera positions to generate “camera paths” in the resulting scan. This let us showcase the videographers path-of-travel through a scan as it was being generated, which would be perfect for after-action-reviews.
The other major implementation I completed was adding a scenario builder to RSET. This let users mock up their environments with objects, avatars, sounds, lights, etc. and then save and share those enhancements with others for training and exploration. Scenario Builder would get many feature updates over the next couple of years to turn it into a powerful tool that lets our users replicate just about anything.
The Last Pre-COVID Review
Spring 2020 was our last “normal” ONR review. Since the 2019 fall review Bill and I had run several experiments with cam-paths to try and flesh it out as a usable feature. This included partnering with a Lexington Laser Tag facility and strapping cameras to the guns to see if we could back out the path’s traveled by the users. Results were promising:
I also had the opportunity to implement a refreshed VR mode for RSET. At the time the only inside-out tracking headset available for us was the Acer WMR (Windows Mixed Reality). Although not as impressive technically as the HTC Vive, it worked great for demos as no lighthouses were required. Paired with a wearable backpack PC, we could offer “Fused Reality” training, where users could move unhindered through their 3D environments (so long as they had sufficient physical space!) The backpack, software, and custom “spectator screen” and mount were all built/integrated by me and tested in my attic.
Although not impressive from a “technical” perspective, a usability tweak I made allowed two disparate scans to be co-located and “saved” within RSET as a single scan. If these scans were captured at different points in time, say, for example, during building construction, you’d get some really cool effects when using the opacity tool in these layered scans:
We had a long list of other performers within our program that we wanted to spin up experiments and technical integrations with, and then COVID hit and everything screeched to a halt.
I’ll cover our work through COVID, hiring an awesome new engineer, and transitioning from a Phase II SBIR to a Full Navy Contract, and then into Startup Culture in the next part. Thinking back on the fact that I started in 2018 having never touched Unity and having roots in firmware and Linux driver development (no where NEAR “user-land”), to having generated close to $2 Million in federal and state funding for Enomalies and RSET in 2 years is still a shock to me. Stay tuned for Part 2!